An Introduction to Terraform with Azure
Terraform is a simple set of declarative scripts that allows a user to define and declare what a computer network should look like. You can define servers, routers, networks, permissions, and....
Introduction
One of the primary benefits of Terraform is its ability to target almost any Cloud Platform. In part one of our series, we wrote an introduction on Terraform with Amazon Web Services (AWS). Today we'll be covering Terraform with Azure.
Terraform is an “IaC” tool, which simply stands for “Infrastructure as Code”. Basically, Terraform is a simple set of declarative scripts that allows a user to define and declare what a computer network should look like. You can define servers, routers, networks, permissions, and a host of other possibilities. These computer networks exist on the Internet, or Cloud, where services like AWS, Azure, and others allow us to request a new server or network component whenever we want it. There are many benefits to this, but for the purpose of this article, we are going to focus on the pieces and how to get a basic Terraform script up and running.
For this first exercise, we’ll be creating a simple Azure App Service and deploying it with Terraform. At the conclusion, we’ll be able to log into Azure and see our new App Service. In future articles, we'll be expanding to showcase a full application deployment. For this first step, we'll be working from a Windows OS workstation, but the steps should be very similar on other operating systems. There are a few prerequisites that we'll first list here, and then we’ll go into how to install and test them to make sure they are working:
- Terraform - https://www.terraform.io/downloads.html
- Azure CLI - https://docs.microsoft.com/en-us/cli/azure/install-azure-cli
- This last one is optional, Visual Studio Code - https://code.visualstudio.com/Download
The Setup – Prerequisites and the boring important stuff
Terraform – download the latest version of Terraform from the link provided above. At the time of publication, you will get a zip file with a terraform.exe file. Simply extract this to somewhere on your local computer. We chose C:\Terraform\, but any folder would work. After you have downloaded Terraform and extracted it, you will want to add the folder path to the .exe in your Windows PATH in your environment variables. The easiest way to get to this is to do the following:
- Open the Control Panel
- Select System
- Select System Settings or Advanced system settings
- Click on the Environment Variables… button
- Select the Path variable and click Edit
- Add your path to the end of the list, in my case C:\Terraform\
Azure CLI – download the latest version of the AWS CLI from the link provided above. You should be able to run the MSI installer and then follow the prompts through to install. The path for this one should be set up during the installation.
Visual Studio Code – VS Code is a great editor that is very popular in the development community, but really any notepad or editor can work. There are some nice plugins for Terraform that do help with highlighting and editing in VS Code.
Next, let’s test Terraform and the AWS CLI! Go ahead and open a command prompt. If you already had one open, be sure to close it and open a new one, as some of the PATH and installation settings may not register if the command window was already open. You should be able to run AWS --version and terraform --version to verify that they are both installed.
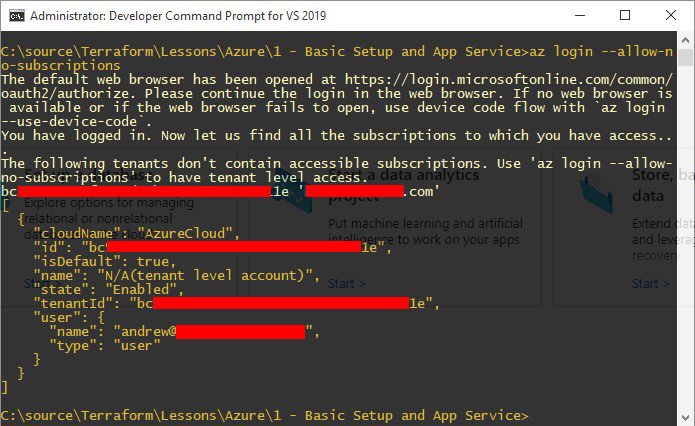
Login to Azure – The easiest way I have found to login into Azure is to simply run the az login command. This will open your browser, allow you to login into Azure, and then use those credentials in all future interactions. In a command prompt run az login –allow-no-subscriptions. This is a very basic authentication, we may explore more advanced and better options in the future:

Example 1
The Good Stuff – Creating an Azure App Service with Terraform
Now that we have all of the setup out of the way, let’s get going with Terraform! The first thing we are going to do is pick a folder, any folder doesn’t really matter. It is just going to be the folder we keep our terraform files in. The first file we want to create in that directory is Main.tf. This is the typical name of the main terraform file. After you create it go ahead and paste in the following code for starters:
provider "azurerm" {
    features {}
}

terraform {
  required_providers {
    azurerm = {
      source  = "hashicorp/azurerm"
      version = "=2.51.0"
    }
  }
}

terraform {
  backend "azurerm" {
    resource_group_name  = "default-resource-group"
    storage_account_name = "jbsterraform"
    container_name       = "tfstate"
    key                  = "example.tfstate"
  }
}

resource "azurerm_resource_group" "example" {
  name     = "example-resources"
  location = "West US 2"
}

resource "azurerm_app_service_plan" "example" {
  name                = "example-appserviceplan"
  location            = azurerm_resource_group.example.location
  resource_group_name = azurerm_resource_group.example.name

  sku {
    tier = "Standard"
    size = "S1"
  }
}

resource "azurerm_app_service" "example" {
  name                = "example-app-service"
  location            = azurerm_resource_group.example.location
  resource_group_name = azurerm_resource_group.example.name
  app_service_plan_id = azurerm_app_service_plan.example.id
}
Let’s break down the pieces:
- provider – This tells the system we will be using Azure. We are not currently defining any other information here.
- required_providers – This is the piece that is telling Terraform what cloud service we are using. In our case it’s Azure. It could be AWS or a different provider.
- backend – this telling the system where the Terraform state will be stored. We want to store it in Azure Storage so that it is accessible from anywhere.
- resource_group_name – a resource group for the Terraform storage container. This will need to be created separately from Terraform.
- storage_account_name – this will be the name of a storage account to store the Terraform state in. This will need to be created separately from Terraform in Azure.
- container_name – this will be the container in the storage account to store the Terraform state file. This will need to be created separately from Terraform in Azure.
- key – the name of the Terraform state file. This can be specified to anything, usually a file name with the *.tfstate extension.
- resource “azurerm_resource_group” – This will be the resource group that our App Service will be placed under. This one is different from the one specified in the backend section, and this resource group will be managed by Terraform.
- name – this will simply be a name for the resource group.
- location – the geographic location for the resource group. The list can be found here.
- resource “azurerm_app_service_plan” – This is the main resource the Application Service Plan that connects:
- name – this will simply be a name for the service plan in Terraform.
- location – we’ll want this to be the same location as the resource group, so we can reference it by doing they type: azurerm_resource_group, the name of the resource group: example, and the property we want to access: location
- resource_group_name – this will be the name of the resource group. We’ll access it the same way we did the location, just use the name property instead.
- sku – this will be the size of the service plan, and is broken out into the following:
- tier – This is the type of plan, we’ll going with the basic “Standard”
- size – This value affects the size of the application service, we’ll be using an “S1”
- resource “azurerm_app_service” – this is the actual application service itself, but it’s going to be pretty simple. We’ve already done most of the work, so we’re just going to be tying it all together.
- name – this will simply be a name for the application service in Terraform.
- location – we want the same resource group that the service plan used, we define it the same way
- resource_group_name – this is defined the same way as the service plan as well, same resource group
- app_service_plan_id – this is the id of the service plan we just created. We can reference it in the same way we did the resource group properties. This time the type is: azurerm_app_service_plan, the name happens to be the same: example and the property we want is: id
That’s a very basic Terraform file. Not a lot going on, but a good starting place to get our feet wet. In a future article, we’ll start tying in other pieces. We can add a database server to the system, start defining who can access or application service, or even start talking about other technologies that can deploy our code to the new system we created!
For now, though, this should be all of the setup we need. Let’s actually deploy this and see our new infrastructure in Azure!
The Finale – Deploying with Terraform
Now that we have all of the pieces we are ready to pull the trigger and deploy our terraform infrastructure, our application service, to Azure. To do so we are going to want to open a command window and navigate to our folder where we’ve been placing everything so far.
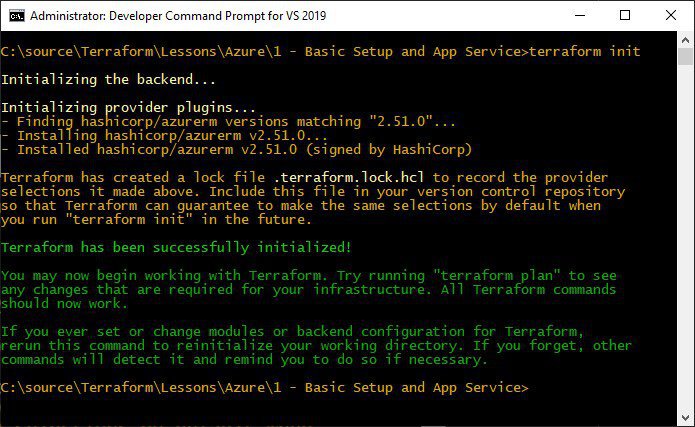
The first command we are going to want to run is terraform init. This gets everything ready to start tracking the pieces and deploying our infrastructure:

Example 2
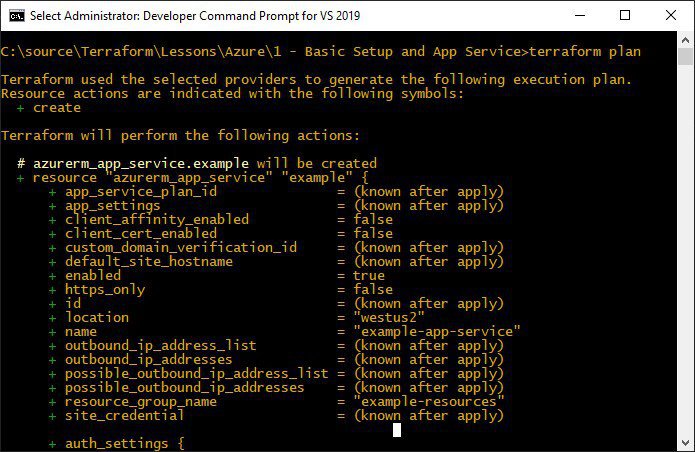
After that’s done we’ll want to toss out a quick terraform plan. Think of this as your compiling step. You should get a heads up of any errors and terraform will give you a heads up of what it will be adding or removing. This can be a big deal. Remember we are literally deploying servers and network systems here. It's important to note that accidentally missing a production server is about to be deleted is bad. The output of Terraform plan should look something like this:

Example 3
There’s a lot of pieces going on, but most of it can be ignored unless you are really getting into the specifics. The biggest part is to look for the green plus signs, or in the case of removing something the red minus signs. We want to be sure we are adding what we expect and removing what we expect; no more and no less.
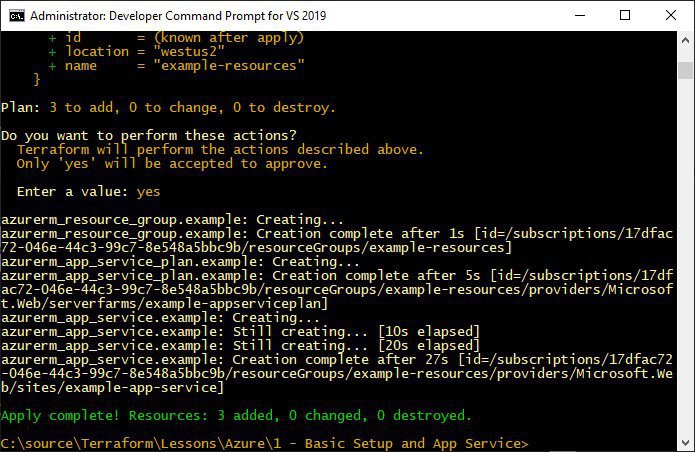
If everything looks good we want to go ahead and run terraform apply as our last command. This will take whatever was in the plan and actually start deploying it to Azure. The system will show the plan output again, another hint to make sure it all looks good, and then ask for us to type yes to begin the process. Go ahead and type out y-e-s and hit the enter button. You’ll see the following:

Example 4
And that’s it! You can log into Azure and view the new Application Service. This was a very basic introduction to Terraform, but this is just the beginning. The power between Terraform and paired Cloud Service like AWS or Azure is a real game changer. It opens the door to begin scaling infrastructure based on demand. Either adding more hardware when needed or reducing it in down time to save money. We also a documented version of our infrastructure in our code base, so we now exactly what the setup looks like. The fun part starts now, what could you do with Terraform and how could it benefit you and your company?

The JBS Quick Launch Lab
Free Qualified Assessment
Quantify what it will take to implement your next big idea!
Our assessment session will deliver tangible timelines, costs, high-level requirements, and recommend architectures that will work best. Let JBS prove to you and your team why over 24 years of experience matters.


